

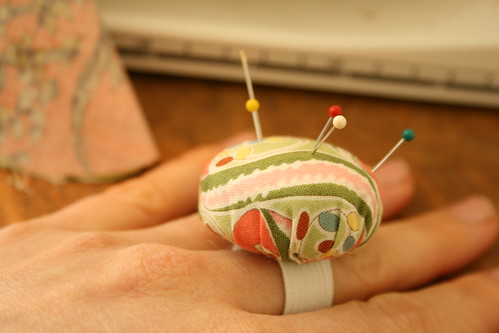
Meet my new favorite accessory, which happens to be the only accessory I'm wearing these days (unless you call pieces of thread, yarn and tiny bits of fabric hanging all over my clothes "accessories").
While cleaning up the kitchen the other night (or rather avoiding cleaning up the kitchen), I spied a plastic screw top lid from a water bottle and the idea of a ring pincushion was born. I'm sure this is not a new idea - I've probably seen it somewhere on the Internet. In fact, after I made my prototype, I googled "ring pincushion" and found a variety of pincushions similar to mine, but none exactly the same. So I decided to go ahead and make a little tutorial for my version of the accessory that I cannot sew without.
DIY Ring Pincushion
Materials:
Small scrap of material
Plastic bottle cap
Stuffing
Short piece of elastic
Needle and thread
Scissors
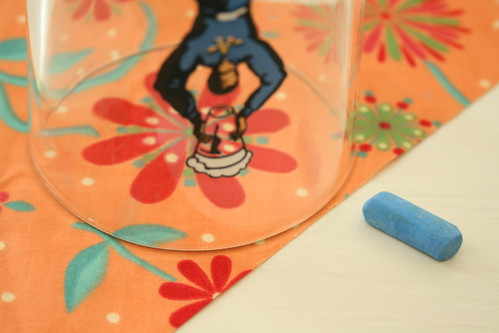
Step 1: Cut a circle from a piece of fabric. I used the top of a pint glass for a template. The rim of a large coffee cup would work just as well.
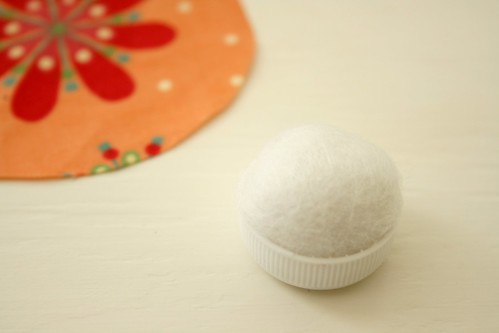
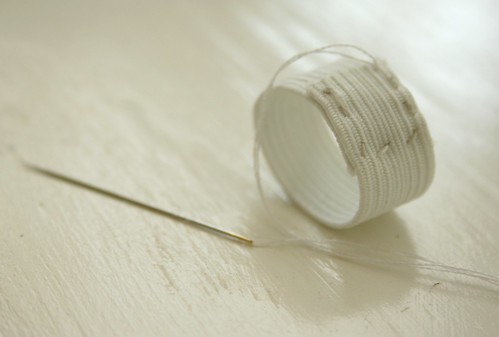
Step 2: Make a smooth, rounded, dense ball of batting/stuffing and push it into a plastic bottle cap.

Step 3: Fold the edge of the fabric circle over about 1/8 of an inch and sew a running stitch all the way around the circle.
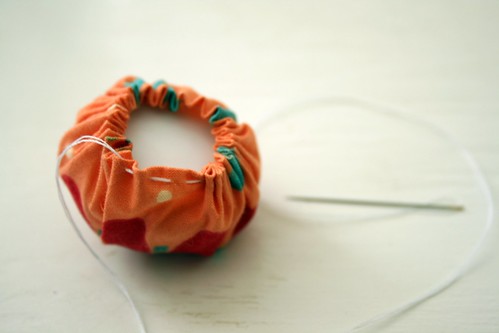
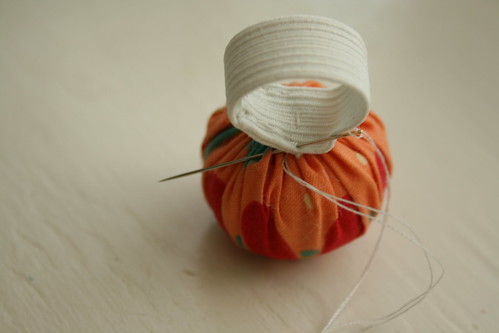
Step 4: Place the plastic bottle cap, stuffing face down, into the middle of the circle and pull the running stitch tight to enclose the cap in the fabric circle. Anchor with a few stitches and a knot.
Step 5: Cut a short piece of elastic, long enough to go around your finger and overlap by 1/2 inch (my elastic measured three inches). Form a circle, overlapping ends by 1/2 inch, and sew the ends together with a running stitch.
Step 6: Sew the elastic ring to the bottle cap pincushion.
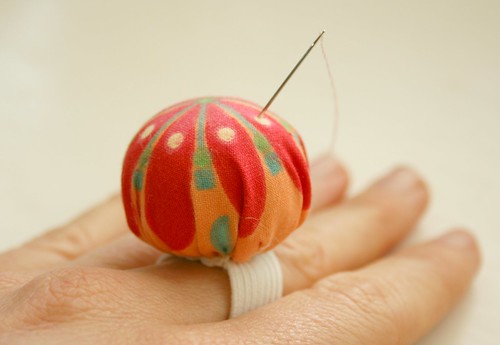
Slip on your new ring and get sewing!
It's been a while since my last giveaway, so I've decided to make and give away two ring pincushions. Just leave a comment to enter and I will draw two winners next week on Wednesday, February 3. I have a few cute fabrics I'm anxious to cut into.

Good luck and have fun if you decide to make your own ring pincushion!

I'd love to be entered. I've been meaning to make myself one but am too busy making valentine gifts!
ReplyDeleteMy quilting mama would love one of those! Perhaps, I'll whip one up for her!
ReplyDeleteWhat a great idea, I have a friend coming for a seing lesson this arvo, maybe I will make her one while we are having her lesson, for her to take away. This would be just what I need in my studio too. Thanks for the tutorial!
ReplyDeletewhat a wonderful idea thanks for the giveaway minsthins at optonline dot net
ReplyDeleteThis is so clever, thanks for sharing!!
ReplyDeleteSuper cute! Super cool! These would make great gifts!
ReplyDeletetoo cute - I am making some with my girls this weekend!
ReplyDeleteGood idea, and simple to make! With the way I am prone to misplacing items in my studio, I think I'll make one of these even if I were to be lucky and win one of your's! It's always nice to have extras with small items like this - I must have about 10 chapsticks stashed in purses, drawers, pockets...you get the idea! Thanks for sharing!
ReplyDeleteWhat a neat idea! It would make a great gift for my MIL.
ReplyDeleteI've seen this sort of thing before, but have never tried it. Yours is very cute. Thanks for the chance to win!
ReplyDeleteToo cute! I bet I could also use Annika's bigger yoyo maker to do that too. Fun!
ReplyDeleteGreat idea and it turned out so nice!!
ReplyDeleteVery nice and handy. I would love to be entered.
ReplyDeleteWhat a clever idea. I'm so bad about putting the pins on the counter and them winding up all over the floor. Now there would be no excuses.
ReplyDeletechipdip2010(at)hotmail(dot)com
What a cute pincushion!! My 7 year old has been on a sewing kick lately, this would be a good little project for her! Thanks for the idea! :o)
ReplyDeleteI LOVE that orange fabric Molly - it's awesome! Thank you for a bright spot on a grey day!
ReplyDeleteWhat a great use of that bottletop, which btw I just found out is not recyclable, just the bottle, in our township at least.
ReplyDelete:)Lisa
Those are adorable! I'd love to win one. I keep finding patterns and tutorials that require stuffing. Looks like I need to make another trip to the fabric/craft store.
ReplyDeleteI would Love one. they are adorable and useful.
ReplyDeleteWow! What a great use a bottlecap. My children will <3 this. Great idea - I had to come out of lurkdom to let you know! :)
ReplyDeleteI'm getting back into the swing of sewing and pin cushion ring. Awesome. Thank you now I found a use for those bottle caps :)
ReplyDeleteWell, I'm a sucker for a giveaway, and I'm always losing my pincushion...
ReplyDeleteMolly... this is great! Love it when ideas come to you like that!
ReplyDeleteI am going to have to make one for my mom and my mother in law. Both always sewing!
Those are adorable! would make a great gift for a sewer! Love it!
ReplyDeleteI love them! And I love the way your mind works, looking at a bottle cap and thinking of something useful to make with it. My thoughts rarely go beyond, "Trash or recycling?"
ReplyDeleteHow cute is that! I have loose pins on the dining room table as I type this. Fabulous.
ReplyDeleteSo cute and fun! Thanks for the tutorial!
ReplyDeleteThank you for this tutorial. I love this idea! You are so clever, and I always appreciate how you take these genius little ideas to completion (and then share them here with all of us!).
ReplyDeleteOh my goodness they're so fantastic, I would be thrilled to win + use one of those lovelies!
ReplyDeleteVery cute and functional, Molly! So glad you included a tutorial! :)
ReplyDeleteSo cute! I might just have to make on of my own using your tutorial - unless one of yours should find its way to me. Great idea!
ReplyDeletewow, how adorable. These look like such a great way to store needles while sewing and having them "handy" all the times. Don´t have time to make them (thanks for the great tutorial nevertheless)- in the middle of finding a new place, writing Master thesis and moving - that´s why I would love to win one. Thanks a lot for your giveaway, Molly!
ReplyDeleteThey look very easy to make (and very handy to have around). Thanks for the giveaway, I'll keep my fingers crossed! ~H
ReplyDeletethis is a great idea. I am currently using a baby sock stuffed with wool as a pincushion. It rolls all around and the pins fall out. I think I need one of these :)
ReplyDeleteGreat idea - thanks for the tutorial!
ReplyDeleteLove the idea of a ring pincushion. I have a wrist one but sometimes my sleeve gets in the way. This would take care of that problem.
ReplyDeleteThose are so awesome - and so CUTE! I was just needing something like that the other day as I worked on the LWR quilts...
ReplyDeleteWhat a great idea I have a couple quitling friends I would love to make this for.....
ReplyDeleteMolly! What a joy it is to see what's new on your blog and this tutorial was wonderful. if I don't win the draw I will just have to attempt one myself for my housemate! have a good day and be well.
ReplyDeleteAdorable. I should totally make one for my mother-in-law.
ReplyDeleteGeNiUs!!! Very awesome.
ReplyDeleteAlso, loved the last post. How thoughtful!
~Karen
That is very cute. It would have come in handy today as I was whipping up two door stoppers to keep the cold air out of part of the house. If I don't win, I'll have to make one myself!
ReplyDeleteWonderful idea and so needed for my sewing adventures!
ReplyDeletePerfect for subway sewing, don't you think?
ReplyDeleteBy the way...your reading list has just been added, part and parcel, to my library request list. Thanks for the suggestions!
Such a great idea! You are awesome :)
ReplyDeleteI'd love to get one, so keep my fingers crossed..
so sweet! if i don't win, i can see myself having to make one...
ReplyDeleteYou are too cool.
ReplyDeleteLovely,better than Michael's!
ReplyDeleteYay! These are so cute. I'll be linking.
ReplyDeleteThese pincushions are adorable!
ReplyDeleteSo ingenious! I am always seeking another purpose for all those little bottle caps that infiltrate my house. And now there's another immediate place for those pins while I am sewing, only a finger span away!
ReplyDeletebrilliant! I love it! thanks for the giveaway!
ReplyDeleteThese pincushion rings are absolutely adorable. I recently found your blog and find it so inspiring. It is so expressive and unique. It makes my heart want to create. Thank you for writing and posting so many wonderful photos!
ReplyDeletelove your recycling! you make some really fun things and i love reading your thoughts about family and such. i really liked the H&A love story (of a sort). very nice words about love, family, welcoming new members into the family...great stuff!!
ReplyDeletewonderful idea! I never remember to keep my pincushion where I need it.
ReplyDeleteWhat a lovely idea. I'd love to be entered.
ReplyDeleteThese are so cute! Thanks for the giveaway :)
ReplyDeleteLovely fabric choices. Thanks!
ReplyDeleteSuch a simple but great idea. Thanks for the chance!.
ReplyDeletelankylegslass(at)hotmail(dot)com
Cute idea! I would love one of these!!
ReplyDeleteThanks for this! I'm excited to make one - well, two actually - one for my mom, a quilter, and one for me, a sewer/crafter! You could really personalize these to match the recipient's personality! THANKS for the inspiring blog!
ReplyDeleteFebruary 3rd is my 40th birthday so I am feeling really lucky! Thanks for the chance to win such a cute thing. I have never seen anything like it!
ReplyDeleteI always love to hear where your creative ideas stem from. You are truly creative Molly! I love the fabric you chose, so bright and lovely! Before having one of your wrist pin cushions I was sticking pins into my spool of thread to not loose them! I have only been hand sewing these days as my sewing machine is not feeling well... it is always a good thing to have my sewing needles close at hand (pun intended)ahem.
ReplyDeleteWhat a great idea!! I would love to be entered, but thank you for sharing your tutorial, so if I don't win it looks pretty easy to make one myself. your blog is great BTW! i am always finding inspiration over ehre, even if I don't comment like I probably should!! :)
ReplyDeleteCheers!
Rachel
64 comments on this.. what more can I say?? :0)
ReplyDeleteThis is just what I need. Thanks for the tute.
ReplyDeleteThis tutorial is so cute! Thank you, these are fantastic!
ReplyDeleteThese are sooo cute Love the fabric and the idea
ReplyDeleteCheers you crafty one
Catie
this is brilliant! i don't know the first thing about sewing, but i'm getting awfully close i tell ya. and your wonderful instructions give me confidence to do so. thank you for always inspiring.
ReplyDeleteJust a little while ago I was sewing and thinking, "Man, I wish I had gotten that finger-pincushion thingie I asked for at Christmastime. I'll have to find a tutorial for that." And then I open my computer and *VOILA!* here's a tutorial! You've made my sewing day.
ReplyDeleteOf course, you'd become my sewing hero of the week if I were to win. :)
Thanks for the chance to enter!
-mab
these pin cushions look perfect for keeping pins close at hand. thanks for the tutorial and giveaway!
ReplyDeleteVery cool! And I LOVE your header, by the way!
ReplyDeleteOoh, this would be so helpful! Great idea, and thanks for the chance to win!
ReplyDeleteSo cute, I have one that Suzie (used to do my nails) gave me a number of years ago!. What a great way to use leftover stuff!
ReplyDeleteThese are so cute. I would love to win one. I do think I need to make some for my sewing friends, also. Thank you for sharing this.
ReplyDeleteI love this! Was thinking about making a wrist pin cushion but this is so much cuter. Thanks so much for sharing.
ReplyDeleteThese are so cute. Thanks for a chance to win one.
ReplyDeleteAdorable! Thanks for sharing how to make 'em!
ReplyDeleteyou are SO talented! thanks for sharing this awesome idea and giveaway chance!
ReplyDeleteI love this! I was just thinking today that I need a new pincushion. Seriously! Thanks for the tutorial and giveaway.
ReplyDeletewhat an awesome idea!
ReplyDeleteI think these are adorable I am going to pass on to my readers Thanks
ReplyDeleteCertainly easy to make, but I'd love to win one!
ReplyDeleteBTW, your tutorial on blog headers was fabulous!
i would love to be entered! your project is so sweet!
ReplyDeleteThank you so much for this idea!
ReplyDeleteI did NOT want to be in the contest because I wanted to make my own! I have, so far, made only one - however I'm thinking this may be an obsession. Gifts for everyone on my list...except for those who are in my crafting group - for them I plan on putting the pieces together and doing it together one evening while sipping tea.
YEA! It is thrifty, eco-savy, and just an amazing idea to use scraps and throwaways!
This is as good as those tape-dispensers that go on your wrist! And I love the fact that it's formed over a bottle cap. Thanks for sharing! I've posted a link.
ReplyDeletePlease throw my hat in the ring. Thanks for the chance.
ReplyDeleteLove this!
ReplyDelete