

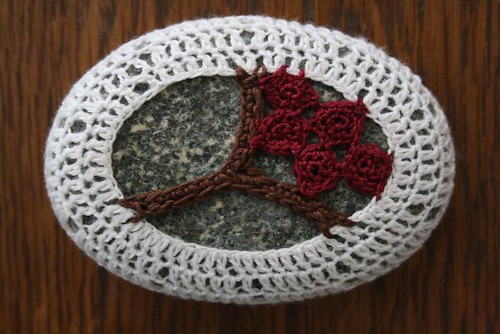
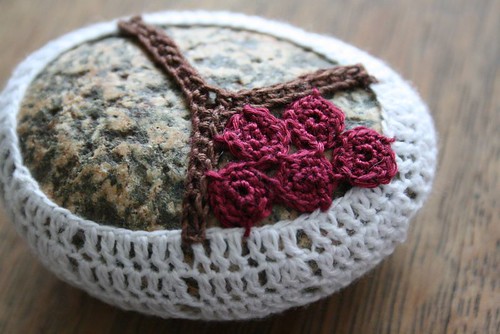
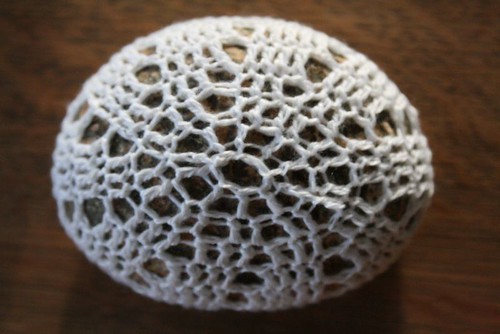
Well, it took me a month, but I finally got around to making another "Winter Berries" crochet covered stone and documenting the process to share with you.
Supplies
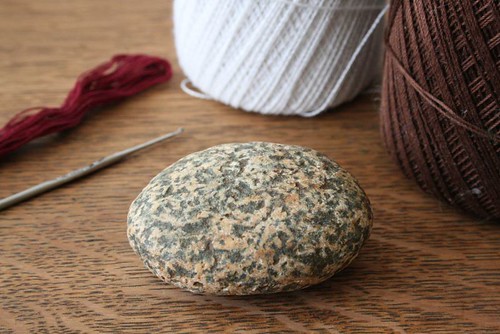
a smooth round rock
white, brown and red or burgundy fine gauge crochet thread
small gauge crochet hook (I used size 8 for this rock)
tapestry needle and scissors
Step 1
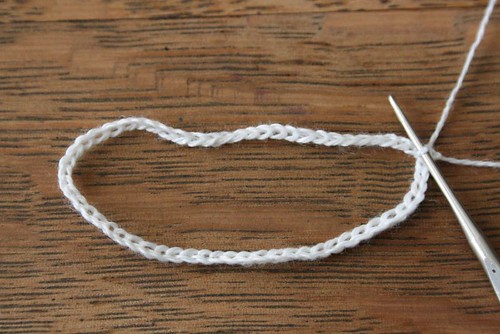
Using white crochet thread, make a chain and join to form circle with a slip stitch. The circle should fit inside your rock. I worked with multiples of 6 for this project, so my circle was a chain of 60.
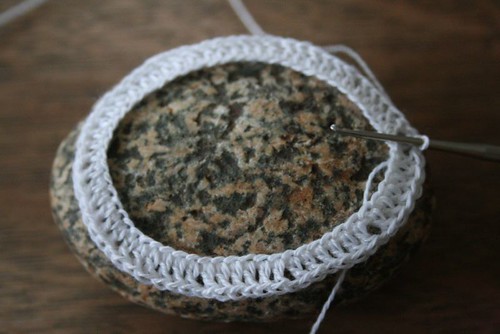
Round 1: Chain 2, dc (double crochet) in next five chains, chain 1. *dc in next six chains, chain 1; repeat from * to end of row and slip stitch to first dc. Chain 2.
Round 2: dc in next four stitches, 2 dc in next stitch, chain 1. *skip one stitch, dc in next five stitches, 2 dc in next stitch, chain 1; repeat from * to end of row. Skip one stitch and slip stitch to the first dc. Chain 2.
After two rows, I started decreasing to accommodate the curve of the rock. If your rock is larger, you can increase another round.
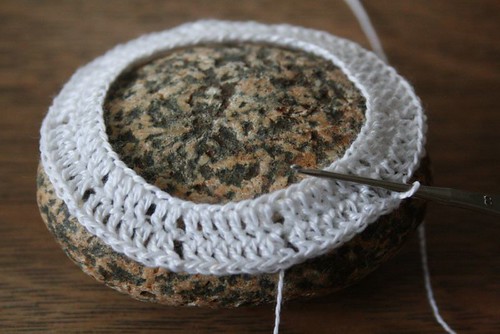
Round 3: dc in next 5 stitches, chain 1. *skip next two stitches, dc in next 6 stitches, chain 1; repeat from * to end of row. Skip two stitches and slip stitch to first dc. Chain 2.
Round 4: dc in next 4 stitches, chain 1. *skip next two stitches, dc in next 5 stitches, chain 1; repeat from * to end of row. Place the cover around the rock, skip 2 stitches and slip stitch to first dc. Chain 2.
You will now be crocheting around the rock, decreasing each row to fit the rock. Crocheting directly onto the rock will take some practice; watch your tension to make sure your stitches are not too tight, but not too loose either. Sorry if this is vague, but it will make sense as you work each round.
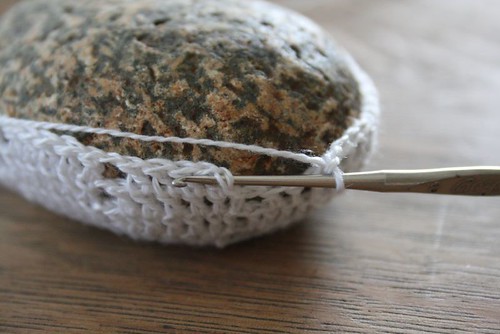
Round 5: dc in next 3 stitches, chain 1. *skip next two stitches, dc in next 4 stitches, chain 1; repeat from * to end of row. Skip 2 stitches and slip stitch to first dc. Chain 2.
Round 6: dc in next 2 stitches, chain 1. *skip next two stitches, dc in next 3 stitches; repeat from * to end of row. Skip 2 stitches and slip stitch to first dc. Chain 2.
Round 7: dc in next stitch. *skip next stitch, dc in next 2 stitches; repeat from * to end of row. Skip 1 stitch and slip stitch to first dc. Chain 2.
Round 8: *skip 1 stitch, dc in next stitch; repeat from * to end of row. Skip 1 stitch and slip stitch to first dc. Fasten off and weave in tail.
Step 2
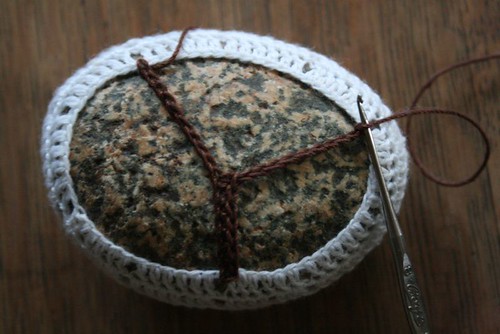
Using brown crochet thread, decide where you want your branch to begin and slip stitch to the edge of the white cover. Make a chain long enough to reach the other side of the rock, slip stitch to anchor "branch", taking care that the chain is long enough that it doesn't pull the two sides together, but not too loose either.
Anchor the branch with one more slip stitch just above the first slip stitch, then single crochet (sc) to the middle of the branch.
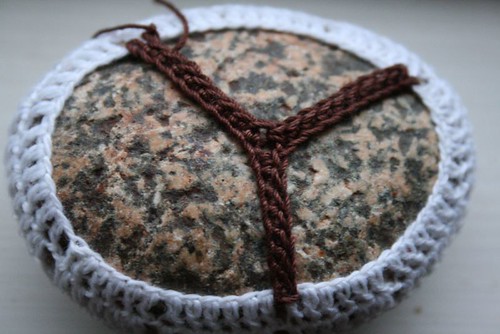
To "branch off" original branch, make a chain long enough to fasten to the edge of the rock cover, anchor with a slip stitch. Anchor again with a slip stitch just above the first slip stitch, and single crochet back to the middle of the branch.
Single crochet along original branch to the beginning of the original chain. Slip stitch to cover and fasten off. Weave in tails.
Step 3
Using red or burgundy crochet thread, you are now ready to make the "berries". I made five.
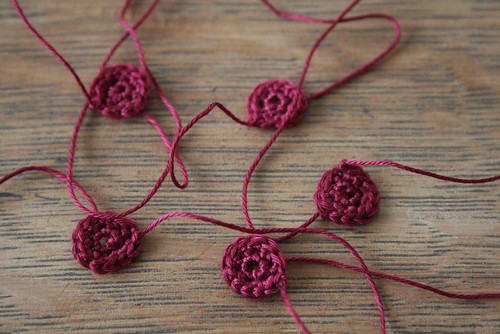
Chain 2, work 6 sc in the second chain from hook. Slip stitch to first sc.
2 sc in each stitch, slip stitch to first sc. Fasten off and cut thread, leaving a 3-4 inch tail.
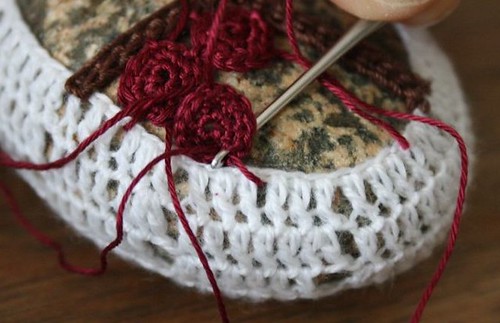
Arrange the berries on the rock where you would like them. Using the tails of each berry and a crochet hook or tapestry needle, fasten the berries to the branch or the edge of the cover, and to another berry. Each berry will be fastened in 4 or 5 places, depending on location. Fasten off tails on the backside of the berries and weave in ends.
If anyone makes a rock cover using this tutorial, feel free to leave feedback. I always get so nervous writing up instructions and I want to make sure this tutorial is a) correct and b) user friendly. I'd love to see your creation too. If you're so inclined, upload a photo to the Covered Stones pool on Flickr.
As if this post isn't long enough, here's a picture of snow covered winter berries in our backyard.
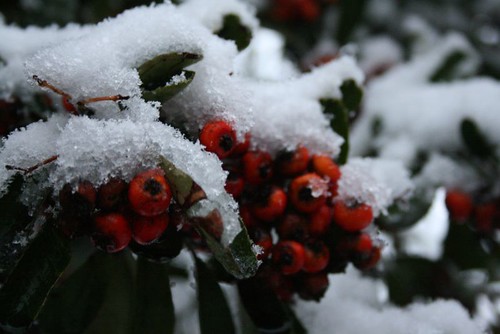
We get snow once or twice a year, and each time I am overwhelmed by the beauty of our home and neighborhood under a cloak of white snowflakes. Snow is truly transforming. More snow pictures on Flickr.

thank you so much! such a beautiful project! now if i only knew how to crochet!!
ReplyDeleteThank you, thank you, thank you. I love this so much I am thrilled to know how to do it. You Rock Molly!(pun intended)
ReplyDeleteThank you Molly - I was going to say that you rock but someone beat me too it.
ReplyDeleteLove the snow - my dad said it had let loose this morning. Beautiful.
oh thank you, thank you :o) I have been just crazy to give this a try :o)
ReplyDelete~simply~
I still say, "why?"
ReplyDeleteLovely!
ReplyDeletethat is so pretty! I wish I could crochet!!
ReplyDeleteThe crocheted rock is so beautiful. Thank-you for the tutorial. The snow picture makes me smile. Happy Valentines Day!
ReplyDeleteThanks for this tutorial! I am new to reading your blog, but I wanted to say that this is an inspired idea, and I hope to try it soon. Wonderful!
ReplyDeleteWOW! This is so, so gorgeous! I am totally in awe of people who can make patterns. Thanks so much for sharing, I'll be linking.
ReplyDeleteSoooo pretty - thank you.
ReplyDeleteI love this look. Very cool. Thanks for the tutorial.
ReplyDeleteHave a great weekend, Karen
i cannot wait to try this project. it is precious. thanks for the sharing.
ReplyDeleteSweet!
ReplyDeleteThank you, I love this project.
ReplyDeleteCrochet speak is a language I don't understand, although someday I'm sure I'll learn it. But it's nice to see your process. :)
ReplyDeleteWhat a creatively amazing idea! I was searching for a 12 yr. old child's apron pattern and came across your site...you are extremely talented and I think your post on your kids and the computer so reminds me of how my children view me...on the computer when I would like to say that it's such a small fraction of time...being a mom is so under rated...not sure if that's one word or two!
ReplyDeleteI think this would be cute over a easter egg too.
ReplyDeleteThank you so much for the tutorial loved it!
I love this. I am just learning to crochet. Thank you so much for this, it is just beautiful and will be my very first project. I know how to SC but I will have to learn what sl means. I think it means slip. I knit, but it is so different from corchet. I keep looking for my other needle. LOL
ReplyDeletethis is amazing
ReplyDeleteLove your work!
ReplyDeleteThat's amazing! Thanks for sharing...I wish I could crochet!
ReplyDeletelittle by little i am getting better at crocheting and i swear once i really get the hang of it i am covering a rock! several actually and sticking them in a bowl- if that wont be a conversation starter i dont know what is....brilliant!
ReplyDeleteThose are really amazingly cute! I can totally picture putting one on someone's doorstep and letting ringing the bell and letting them discover such a sweet little charming treat! Nice job!
ReplyDeleteGreat tutorial. I too have been admiring Resurrection Fern's covered rocks so was excited to see your tutorial. Your instructions were very clear and easy to follow. I got totally nervous and my tension was all screwed up, so I couldn't do the lovely berry embellishments you have here... had to leave a long tail and cinch up the open side in order to salvage the work! Going to try again right now, though...
ReplyDeleteI absolutely love your rock ... therefore you rock!!!I have been drooling over Resurrection Fern's crocheted rocks for some time now and did not know how one went about crocheting around a rock so I was thrilled to see this post on Craftzine. Can't thank you enough for posting it. Looks like I will be reading your blog now on a regular basis.
ReplyDeletewho are you on ravelry? what ID?
ReplyDeleteThank you for sharing...I can't believe how beautiful and creative this is.
ReplyDeleteI have been giving this an honest to goodness try...so far I have invented several unknown crochet stitches! I love your tutorial and will continue to make attempts as often as I can...I intend to have a thread covered stone even if it means going bonkers!
ReplyDeleteLove your writing, creativity and energy.
Have a great week!
i've been ordering margie's stones every time i can get to her etsy in time and actually just bought beautiful tiny yarn and a crochet hook to attempt it myself. too bad i've never crocheted, so i've got to learn that first! thanks for the tutorial!
ReplyDeleteThis comment has been removed by a blog administrator.
ReplyDeleteThese are lovely and would make wonderful pattern weights with flat stones and the crochet would stop them shifting easily.
ReplyDeleteBeautiful! I love it. Wish I knew how to crochet!
ReplyDeleteThis comment has been removed by a blog administrator.
ReplyDeleteThis comment has been removed by a blog administrator.
ReplyDeleteThis comment has been removed by a blog administrator.
ReplyDeleteThis comment has been removed by a blog administrator.
ReplyDeleteThis comment has been removed by a blog administrator.
ReplyDeleteThis comment has been removed by a blog administrator.
ReplyDeleteThis comment has been removed by a blog administrator.
ReplyDeleteThis comment has been removed by a blog administrator.
ReplyDeleteThis comment has been removed by a blog administrator.
ReplyDeleteThis comment has been removed by a blog administrator.
ReplyDeleteThis comment has been removed by a blog administrator.
ReplyDeleteThis comment has been removed by a blog administrator.
ReplyDeleteThis comment has been removed by a blog administrator.
ReplyDeleteThis comment has been removed by a blog administrator.
ReplyDeleteThis comment has been removed by a blog administrator.
ReplyDeleteThis comment has been removed by a blog administrator.
ReplyDeleteThis comment has been removed by a blog administrator.
ReplyDeleteThis comment has been removed by a blog administrator.
ReplyDeleteThis comment has been removed by a blog administrator.
ReplyDeleteThis comment has been removed by a blog administrator.
ReplyDeleteThis comment has been removed by a blog administrator.
ReplyDeleteThis comment has been removed by a blog administrator.
ReplyDeleteThis comment has been removed by a blog administrator.
ReplyDeleteThis comment has been removed by a blog administrator.
ReplyDeleteThis comment has been removed by a blog administrator.
ReplyDeleteThis comment has been removed by a blog administrator.
ReplyDeleteThis comment has been removed by a blog administrator.
ReplyDeleteThis comment has been removed by a blog administrator.
ReplyDeleteThis comment has been removed by a blog administrator.
ReplyDeleteThis comment has been removed by a blog administrator.
ReplyDeletelove it!!thanks!!
ReplyDeleteI really love your tutorial! I like that you have lots of pics! Thank you so much!
ReplyDeleteThis is so lovely! Thank you for the tutorial, I can't wait to try it!
ReplyDelete