


Toadspool Tutorial
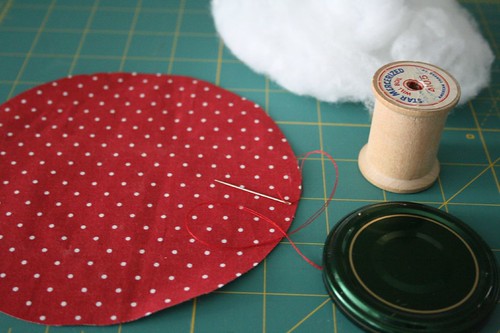
Materials: 6 inch round piece of fabric, needle and thread, wooden spool, small jar lid, stuffing
Step 1: Begin by making a yo-yo with the 6 inch round piece of fabric. (For those of you who haven't made yo-yos, fold the edge of the fabric over 1/4 inch or so as you make a running stitch around the entire perimeter of circle. Heather Baily has a detailed tutorial here.)
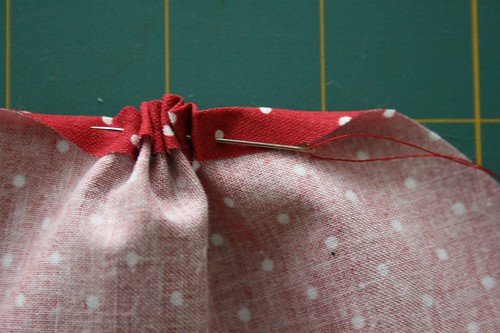
Step 2: Gently pull the running stitch to gather the edge of the circle towards the center. When the edges are about 2-3 inches apart, stuff the yo-yo with the stuffing and insert the jar lid. Continue to pull the running stitch to gather the yo-yo until the opening is just slightly smaller than the top of the spool. Secure yo-yo (now the mushroom cap) with a few stitches.
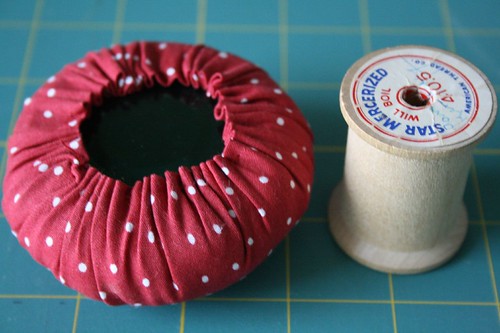
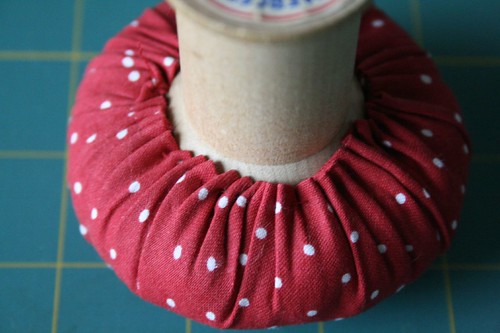
Step 3: Glue the wooden spool to the mushroom cap.
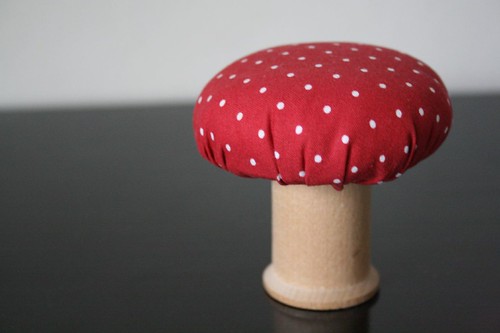
Enjoy your toadspools!

Cute, cute, cute. I wonder if you might find more wooden spools at Grandma Mary's?
ReplyDeleteWonderful tute, Molly! Love your toadspools soo much!
ReplyDeleteoh happy day! the laundry can wait a little longer can't it? now the babe, hmmm, she may not be able to wait. thanks so much for the cute tute! xxx
ReplyDeleteAWW, that is DARLING! Great use of a spool, I just love it! Thanks so much for sharing this with us, I'll be linking to this fun project.
ReplyDeleteAdorable! I didn't think it was that easy! Way to use what you already have around!
ReplyDeleteso sweet!
ReplyDeletewhat a cute little pincushion!
ReplyDeleteI love it! Wooden spools are great, aren't they?
ReplyDeleteSo cute and something I think I can make, thank you for sharing.
ReplyDeletenow that is something that my balcony girls could do (in my sidebar). love it! great photos and blog. sandy
ReplyDeleteThanks for the idea - very cute.
ReplyDeleteToo cute! Now I need to hunt up a spool! Thanks for sharing this cute idea!
ReplyDeletethis is great Molly - thanks! This would make a very nice little gift.
ReplyDeleteHey you made it on this blog:
ReplyDeletehttp://www.oneprettything.com/
cool!
have a great day~karen
very cute!
ReplyDeletewell, there you go again. another magnificent tutorial!
ReplyDeletethanks for the comments too, by the way. :)
I made one! I made one! Come and see it on my blog!
ReplyDeletei love these, molly. I tried to make one last year when I found it in an old crafting book, but the pattern didn't call for the small jar lid. so getting it to stick to the spool was really hard. This is SO good! I can't wait to try again!!
ReplyDeletejust came upon your blog - subscribing to it via google. what an adorable idea! love it!
ReplyDeleteThats Adorable mushroom pincushion.
ReplyDeleteLoved how you did your tutorial.
Wonderful job!
I love this project! I Especially like your use of the spool as the bottom of the mushroom... very clever. I just added a link to this project from my blog.
ReplyDeletevery cute and practical! i really like it.
ReplyDeletei set a link. i hope you'll agree.
thank you.
many greetings, doro.
This has been a great help, thanks a lot, now to make a mushroom pincushion is very easy with your tips. Thank you
ReplyDeleteThanks, I've been needing a new pin cushion! :)
ReplyDeleteHow cute! Just found this while looking for mushrooms projects to do with my little girls. Thanks!
ReplyDelete